WebToModule
WebToModule for SuiteCRM
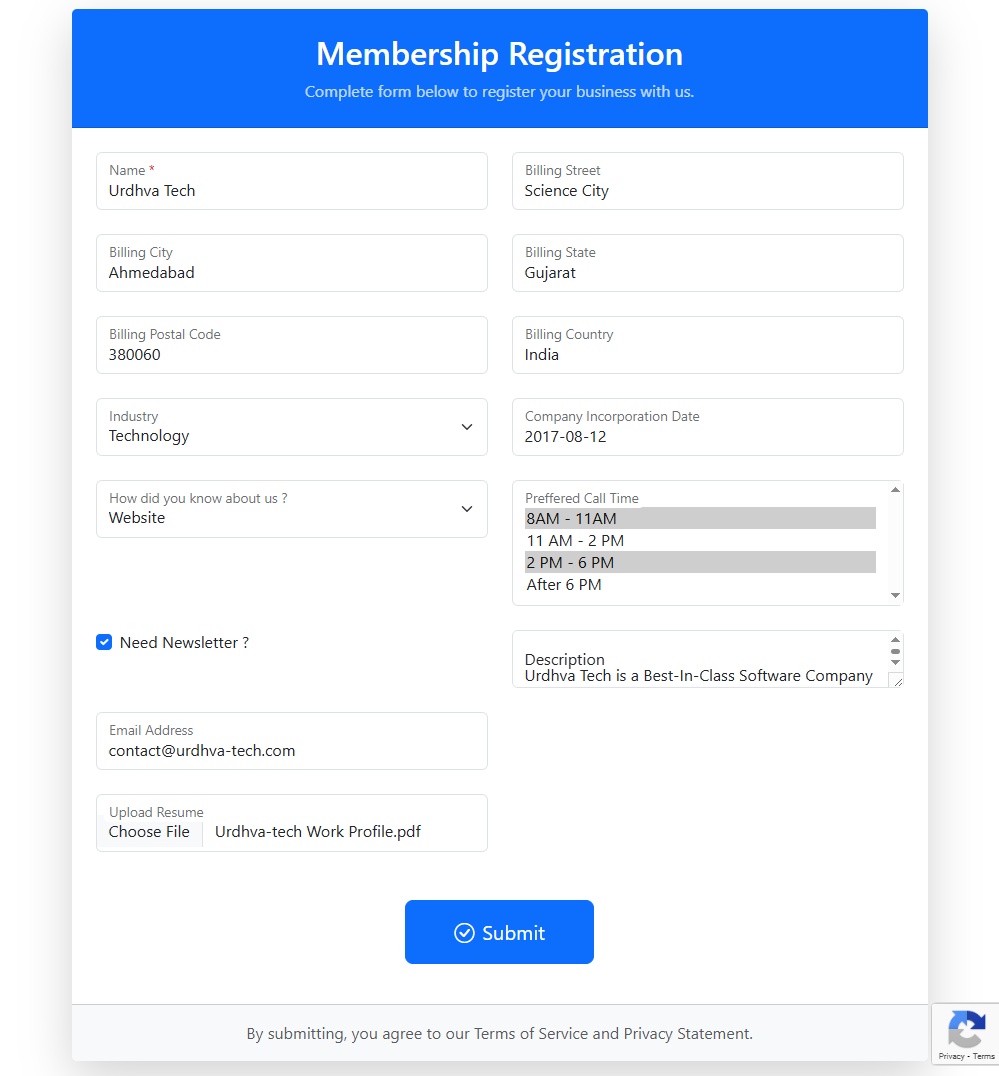
A web-to-lead form is an essential component of marketing and sales automation. Its purpose is to capture data submitted by website visitors, such as contact information and product interest, and store it as a "Lead" record in a SuiteCRM product.
WebToModule serves a lot more than a simple web-to-lead, it allows the company to gather data to any pre-built or custom module of the SuiteCRM. With additional features and more control over the standard webforms.
Unlike basic leads forms that may only for lead specific field. But what if your customer base is different and you need them to be add data in specified module, Here we come in existance, By our web to module, You can create a web form for any built-in or custom module in your SuiteCRM, so you will have customer specific, personalized information about the data you are capturing for your customer. Having this information helps your business to get more qualified and accurate data in your CRM. other then this their are many features equipped with this webtomodule as below.

Main Features
-
Supports Built-in and custom modules.
-
Supports default workflow.
-
Auto-Response Email Notification.
-
Configure duplicate checking on the specified field.
-
Fully HTML5 based WebForms
-
Leverage to choose custom fields for the WebForms
-
Google reCAPTCHA v3 for prevent spamming
-
Allow records to Create / Update
-
Assign record to specific user
-
Assign record to security groups
-
Ability to collect documents
It's easy to install. Once you have installed the add-on and configured the license key, You can create as many forms as you want. Now once you click on Create a WebtoModule record. You will have a wizard with few steps only!

1. Select module
Now select a module, for which you would like to create a web-form. It may be, Cases, Leads, Contacts or can be any custom module.
2. Select Module fields(s)
Now you can select a field of the module that you would like to set into the web form. You will have a list of all fields that are available of the module that you have selected in the previous step.
3. Set default value
In this step, you will have a list of fields with their respective type, which will prefilled as default value during web form submission, Even you can make a hidden field with default value using checkbox checked "Mark As Hidden". For example, If you have a preset value to submit during the form submission. You can set the default value as well as hidden into the form.
4. Select required field(s)
You can select fields that should be required for submitting the form. You will have a list of all the fields that are selected in step 2. You have to drag and drop fields that you wish to have the required field in the form.
5. Duplication
You can select fields that you would like to check for a duplicate. For example, You have selected Email Address.In the last step you will have an option called "Prevent duplicate", If that is checked, It won't allow update of the records else by default if duplicate found it will update the record.
6. Configuration
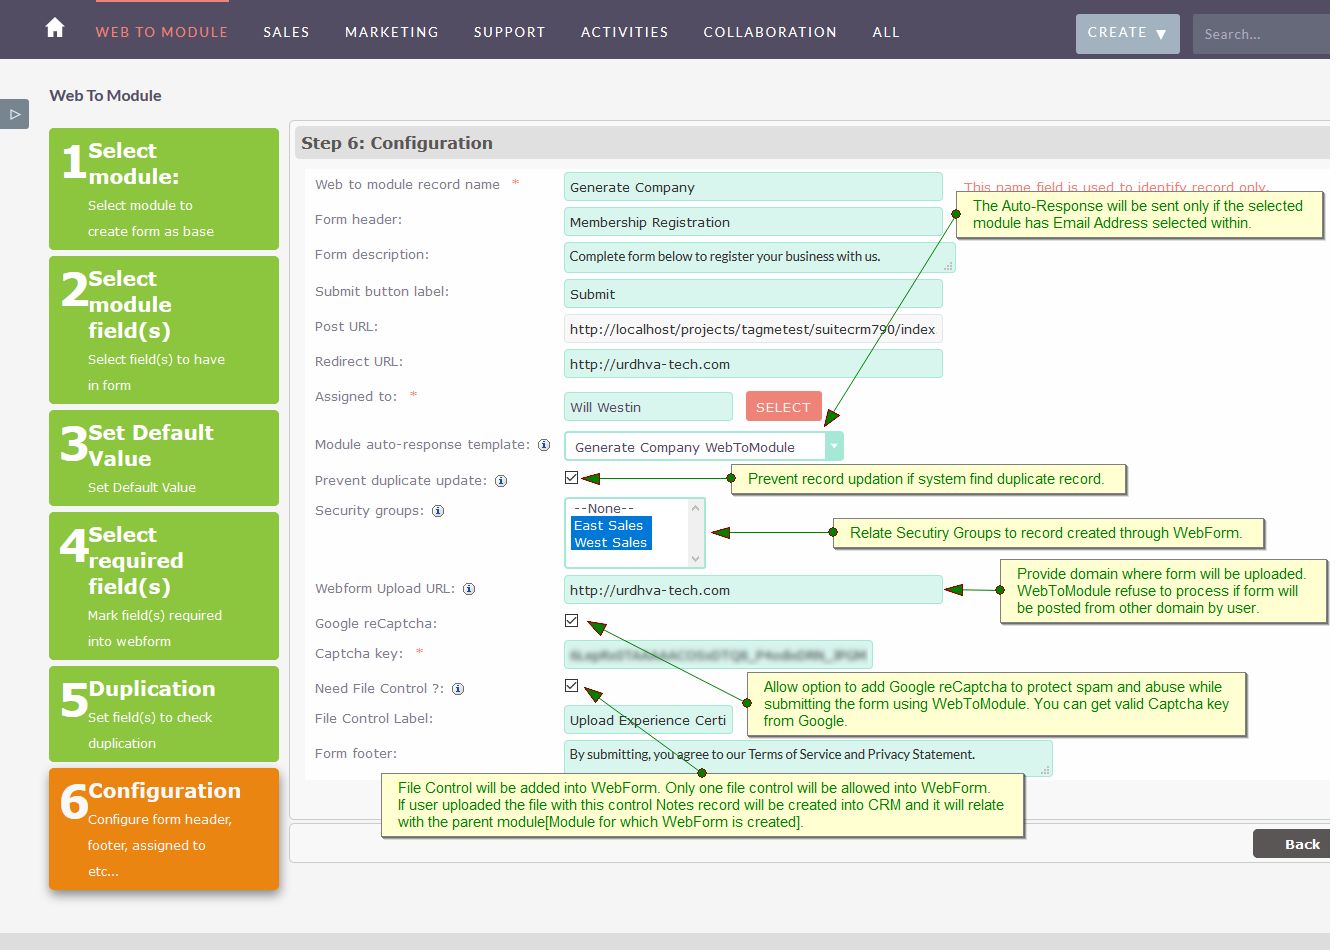
In configuration screen, You will have multiple option mainly related to forms. You can set Form Header, Footer, Form Description, Label, Redirect URL, Google Captche etc...
- Web to module record name: Name of the WebForm in CRM.
- Form header: Header of the generated form.
- Form description: Description content for the WebForm, Will be shown on the generated form.
- Submit button label: Label of the button that will be displayed on the form.
- Post URL: When visitor submits the form it will be posted to this URL. User cannot edit this URL as it needs to be fixed. Make sure your site_url variable is correct in config.php else it will be posted to wrong address.
- Redirect URL:After submission of the form. Users will be redirected to this URL with predefined status. If you wish to show them message or greet on successful submission, you will have status as shown below.
- "duplicate_found": If prevent duplicate selected and duplicate found it will be redirect with status= "duplicate_found" so you can show them appropriate message.
- "created": When user submits the form and new record created, it will be redirected to URL with status="created".
- "updated": If duplicate found and you have unchecked prevent duplicate. It will update the record and redirected with status="updated".
- Assigned to: Created/Updated record will be assign to specified user.
- Module auto-response template: Select the auto response email template to send email to the visitor upon form submission. Template will be parsed based on the selected module. Note: it will be send only if the module selected has email address in web form and not empty.
- Webform Upload URL: Provide the domain where form will be uploaded. WebToModule also process the request from sub-domain too. For Example, We have provided value http://urdhva-tech.com into "Webform Upload URL" field. Now if any users submit the form request from http://urdhva-tech.com or any other sub-domain like http://webtomodule.urdhva-tech.com then WebToModule accept it and process the request. If user submits the request from any other domain then WebToModule refuse to process.
- Google reCaptcha: Client side and server side captcha validation to protect WebForm from spam. Check this if you want to have captcha enabled on your form.
- Captcha Key: Get the valid Google Captcha Keys. reCAPTCHA v3 requires both the Site Key and Secret Key.
- Need File Control: File Control will be added into WebForm. Only one file control will be allowed into WebForm. If user uploaded the file with this control, Notes module record will be created into CRM and it will relate with the parent module[Module for which WebForm is created].
- File Control Label: Text string for file control which will display into WebForm.
- Form footer: Footer of the generated form.

